Lo scopo di questa pagina è di mostrare il funzionamento
di un semplice LaserShow basato su una coppia di galvanometri.
The aim of this page is to show how a simple galvanometers
based LaserShow works.
Il LaserShow permette di deflettere un raggio LASER
utilizzando due specchietti: uno lo devia sull'asse X, l'altro sull'asse Y.
Tutto è pilotato da un computer e il sistema permette di disegnare scritte e
figure anche in movimento.
Concettualmente il computer, tramite un programma apposito, invia dei segnali
alla porta USB, che è collegata ad un Convertitore Analogico-Digitale (nel mio
caso tale convertitore funge anche da chiave hardware, senza la quale il
programma non funziona). Dal Convertitore Analogico-Digitale escono tutti i
segnali necessari per pilotare i galvanometri: deflessione sull'asse X,
deflessione sull'asse Y e blanking per i vari colori (nel mio caso sono tutti
mappati sul verde). Il segnale di blanking (condotto tramite il cavetto che
arriva sul retro dell'alimentatore del LASER) accende e
spegne il fascio in modo opportuno. I segnali di scansione X e Y sono
amplificati in potenza da due opportuni amplificatori che pilotano infine i due
galvanometri che recano gli specchietti sui loro assi.
The LaserShow can deflect a LASER beam using two mirrors: one deflects the
X-axix, the other one the Y-axis.
Everithing is driven by a computer and the system allows to draw writings and
eventually moving pictures.
Conceptually, the computer, via a custom program, sends signals to the USB port,
which is connected to an Analog to Digital Converter (in my case, this converter
also acts as an hardware key, without which the program will not work). From the
Analog to Digital Converter (later on, ADC) comes out all the necessary signals
to drive the galvanometers (later on, galvos): deflection in the X-axis,
deflection in the Y-axis and blanking for the different colours (in my case all
are mapped to the green). The blanking signal (carried by the cable that comes
on the rear of the LASER power supply) switches on and off
the beam properly. The scan signals X and Y are amplified in power by two
appropriate amplifiers that finally drive the two galvos bearing mirrors on
their axes.
Tranne il computer e il LASER, il sistema viene venduto
dalla LaserWorld: il sistema di
scansione si chiama
LW-50K; il SW si chiama
Showeditor e il Convertitore Analogico-Digitale si chiama
Laserworld USB Interface ed è basato sull'interfaccia
Minilumax.
Except for the computer and the LASER, the system is sold by
LaserWorld: the scan system is called
LW-50K, the SW is called
Showeditor and the ADC is called
Laserworld USB interface and it is based on the
Minilumax interface.
Ci sono anche alternative gratis per il SW (es. HE-Laserscan)
e per il Convertitore Analogico-Digitale (es. bILDA).
Il connettore e i segnali in uscita del Convertitore Analogico-Digitale sono
standardizzati dall'International Laser
Display Association (ILDA).
There are also free alternative to the SW (i.e.
HE-Laserscan) and to the ADC (i.e.
bILDA).
The connector and the output signals of ADC are
standardized by the International Laser
Display Association (ILDA).
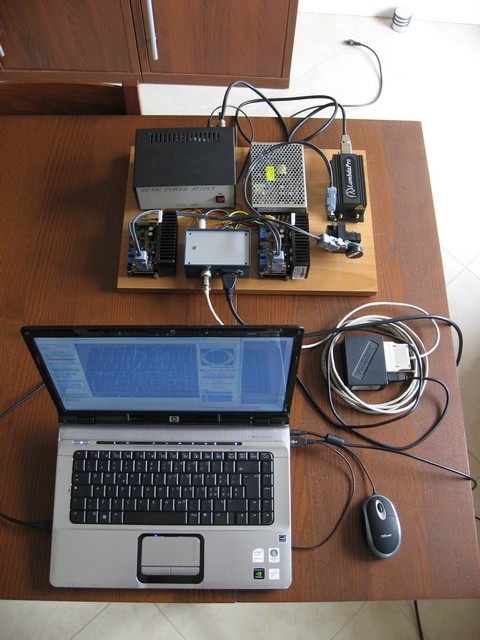
Qui sotto si vede tutto il sistema.
In alto, sulla tavoletta di legno, da sinistra c'è l'alimentatore per il
LASER verde, l'alimentatore per i due amplificatori e la
testa del LASER verde.
In basso, sulla tavoletta di legno, da sinistra c'è l'amplificatore dell'asse Y,
una scatoletta di cablaggio, l'amplificatore dell'asse X e il blocchetto che
sostiene i galvanometri.
Sotto si trova il computer e, alla sua destra, si vede la scatoletta nera che
contiene il Convertitore Analogico-Digitale. Il cavo bianco porta i
segnali analogici verso gli amplificatori.
Below you see the whole system.
High, on the wooden board, from left there is the power supply for the
green LASER, the power supply for the two amplifiers and
the green LASER head.
Below, on the wooden board, from left there is the amplifier of the Y-axis, a
box of cabling, the amplifier of the X-axis and the block that supports the
galvos.
Below there is the computer and, to his right, you can see the little black box
that contains the ADC. The white cable carries the analog signals to the
amplifiers.
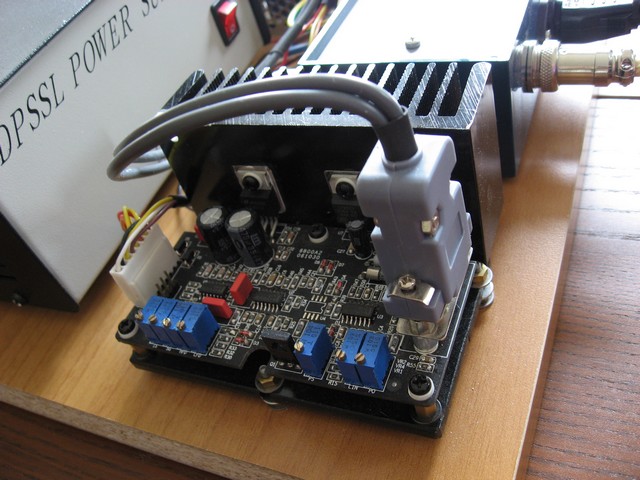
Qui sotto si vede in dettaglio l'amplificatore dell'asse Y.
Pụ sembrare complicato per essere un amplificatore ed in effetti lo è.
Il fatto è che i galvanometri non possono essere pilotati direttamente dai segnali
provenienti dal Convertitore Analogico-Digitale perché hanno una seppur bassa
inerzia. Cị fa ś che quando, per esempio, si vuole disegnare un quadrato, dopo
i repentini cambi di direzione ai vertici, lo specchio inizia ad oscillare con
un moto armonico smorzato e non è possibile tracciare i segmenti di retta che
costituiscono i lati: i lati apparirebbero ondeggianti. È necessario quindi
introdurre un sistema ad anello di retroazione che monitori, istante per
istante, la reale posizione degli assi dei galvanometri. Tali segnali di
retroazione sono rimandati agli amplificatori che provvedono a modificare in modo
opportuno i segnali di pilotaggio dei galvanometri.
Below you can see in detail the Y-axis amplifier.
It may seem complicated to be an amplifier and really it is.
The fact is that the galvos cannot be driven directly by signals from ADC
because they have an although low inertia. This means that when, for example,
you want to draw a square, after the sudden changes of direction at the vertexes,
the mirror begins to oscillate with a damped harmonic motion and you cannot
trace the straight-line segments that make up the sides: the sides appear wavy.
It is therefore necessary to introduce a feedback closed loop that monitors,
moment by moment, the actual position of the axes of the galvos. These feedback
signals are sent back to the amplifiers that should vary appropriately the signals
to drive the galvos.
Altrettanto complesse sono le tarature di un amplificatore coś fatto.
Come si pụ vedere, ci sono ben sette trimmer di taratura: da sinistra: Size, Servo Gain,
Low Frequency Damping, High Frequency Damping, Position, Linearity e Offset.
Il trimmer dell'Offset non deve essere toccato e, normalmente, anche quelli del
Size e del Position.
La taratura dei trimmer del Servo Gain,
del Low Frequency Damping e del High Frequency Damping avviene seguendo regole precise e con infinita pazienza, perché la
taratura di un trimmer influenza quella degli altri. Se si sbaglia, si rischia
di mandare i galvanometri a fine corsa o in oscillazione, rischiando di
distruggerli.
Per fare un paragone, si pụ pensare a tre persone che devono salire una scala
tenendo ciascuna una gamba di uno sgabello sul quale ci sia una ciotola piena
d'acqua: per non rovesciare l'acqua dovranno certamente salire lentamente e,
soprattutto, tenere presente i
movimenti degli altri due.
Equally complex are the calibration of a so done amplifier. As you can see,
there are seven calibration trimmer from left: Size, Servo Gain, Low Frequency
Damping, High Frequency Damping, Position, Linearity and Offset. The Offset
trimmer should not be touched and, normally, even those of the Size and
Position.
The calibration of Servo Gain, Low Frequency Damping and High Frequency Damping
trimmers occurs according to precise rules and infinite patience, because the
calibration of a trimmer influences those of the others. If you make a mistake,
you could send the galvos to the end position or in an oscillating condition,
risking of destroying them.
To make a comparison, one can think of three people who have to climb a ladder,
taking each a leg of a stool on which there is a bowl full of water: in order
that not to spill the water they certainly will have to go up slowly and, above all,
pay attention to the movements of the other two.
Per concludere sugli amplificatori, a sinistra si vede il
connettore bianco che porta l'alimentazione da ± 24 V ed il segnale di deflessione
proveniente dal Convertitore Analogico-Digitale; sulla destra si vede il
connettore grigio che porta il segnale di potenza per pilotare il galvanometro
ed il relativo segnale di retroazione.
To conclude on an the amplifiers, to the left there is the white connector that
brings ± 24 V power and the deflection signal from the ADC; on the right there
is the gray connector that carries the signal power to drive the galvo and its
feedback signal.
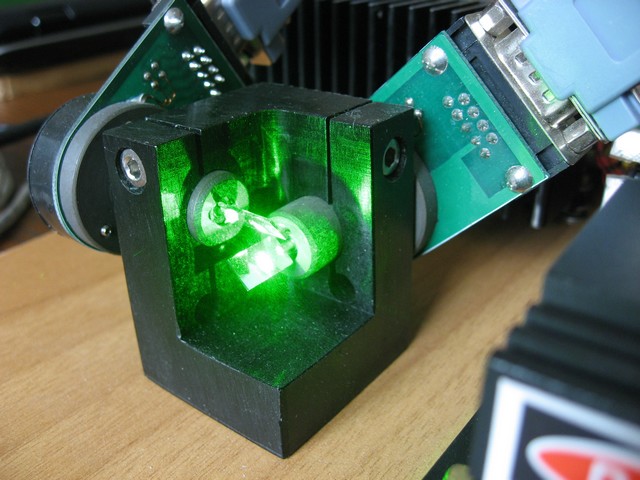
Qui sotto si vede il dettaglio della coppia di galvanometri,
orientati a 90o uno dall'altro.
Come si sarà ormai capito, occorre che la massa in movimento sia minima: cị
richiede di avere piccoli specchietti con vetro molto sottile.
Il fascio proveniente dal LASER sulla destra incontra
prima lo specchietto in basso (asse X) e viene deviato verso l'alto. Poi
incontra lo specchietto in alto (asse Y) e torna ad essere orizzontale.
Here below you can see the details of the pair of galvanometers, 90o
oriented to each other.
As you will have understood by now, it is necessary that the moving mass is minimal:
this requires you to have small mirrors with very thin glass.
The beam from the LASER on the right first meets the
mirror at the bottom (X-axis) and is deflected upward. Then it meets the mirror
at the top (Y-axis) and becomes horizontal.
Per rendersi conto di che cosa sta dietro ad un sistema di
scansione LASER, si pụ vedere l'ottimo
sito di ELM, che ha
costruito da solo un completo sistema di scansione.
To understand what lies behind a laser scanning system, you can see the
excellent ELM's WebSite,
which has built by himself a full system scan.
Che cosa si pụ fare con un LaserShow? Tipicamente si possono
disegnare figure, farne animazioni e tracciare scritte. Qui sotto puoi vedere
alcuni esempi.
Beh, molte cose le hai già viste nelle pagine degli
HoloMeeting.
Due scritte le puoi vedere nella HomePage e nella pagina
dedicata ai LASER.
Ho alcuni esempi, del capodanno 2010, di proiezioni sul palazzo di fronte a
quello dove abito: l'ora, una
coppia di calici e una
sequenza di figure astratte.
Da ultimo, due esempi di figure animate: un'oca
e un delfino.
Qui c'è un esempio di LaserShow: musica e
proiezione LASER sincronizzati (sono circa 17 MB). Le linee bianche sottili e
veloci sono
un difetto di lettura del
CCD della
macchina fotografica.
What can you do with a Lasershow? Typically you can draw pictures, make
animations and draw writings. Here below you can see some examples.
Well, you have already seen many things in the HoloMeetings'
pages.
Two writings may be seen in the HomePage and in the page
dedicated to the LASERs.
I have some examples, of the New Year 2010, of projections on the building
opposite to that where I live: the time, a
pair of goblets and a
sequence of abstract figures.
Finally, two examples of animated figures: a
goose and a dolphin.
Here there is an exaple of LaserShow:
synchronized music and LASER projection (the size is about 17 MB). The white thin
and quick lines are a camera
CCD reading
defect.
Per vedere le statistiche di accesso a questo sito dal 9 agosto 1999:
To have a look at the statistics of this site from August 9, 1999:
Torna in cima alla pagina
Back to top
Copyright © 1999-2025 Alberto Marturini
Pagina aggiornata il: 23 gennaio 2010.
Last update of this page: January
23, 2010.
$