Finalmente ho terminato la costruzione del mio nuovo
contatore Geiger. I primi due contatori Geiger sono
stati l'LX.772 di Nuova Elettronica, costruito nel 1986 appena dopo l'incidente
di Chernobyl, e un
Frieseke&Hoepfner FH40T, un
contatore militare della Germania dell'Est
del 1964.
Finally I ended thew construction of my new Geiger counter. The first two
Geiger counters I owned were the
Nuova Elettronica LX.772, built in 1986 after
the Chernobyl disaster, and a
Frieseke&Hoepfner FH40T, a military counter
from East Germany, built in 1964.
Questo contatore Geiger č basato su un processore ATMEGA328P (item ebay: 180902957524),
compatibile Arduino.
Come sonde ho scelto tre
tubi Geiger-Müller russi.
Il primo č il SI-29BG (item ebay:
190688851897) che sopporta, senza saturare, alti livelli di
radioattivitŕ. Il secondo č il SI-8B (item ebay:
400290760149), molto piů sensibile del primo. Il terzo č il
SBT-11A (item ebay: 281130143163), sensibile anche alle radiazioni
Alfa.
This Geiger counter is based on a ATMEGA328P
processor (ebay item: 180902957524),
Arduino compatible. I choose as probes three russian
Geiger-Müller tubes. The first
one is the
SI-29BG (ebay item:
190688851897) that tolerates, without saturation, high
radioactivity levels. The second one is the SI-8B (ebay
item:
400290760149), more sensitive than the first one. The thist
one is the SBT-11A (ebay item: 281130143163) sensitive to
Alpha radiation too.
Qui puoi vedere
la pagina del contatore e
qui
lo schema elettrico.
Here you can see the counter
webpage and
here the schematics.
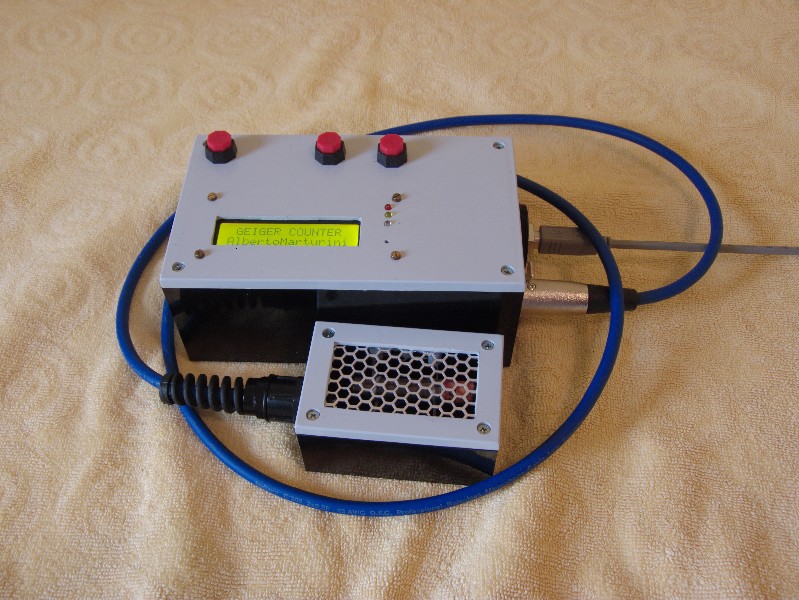
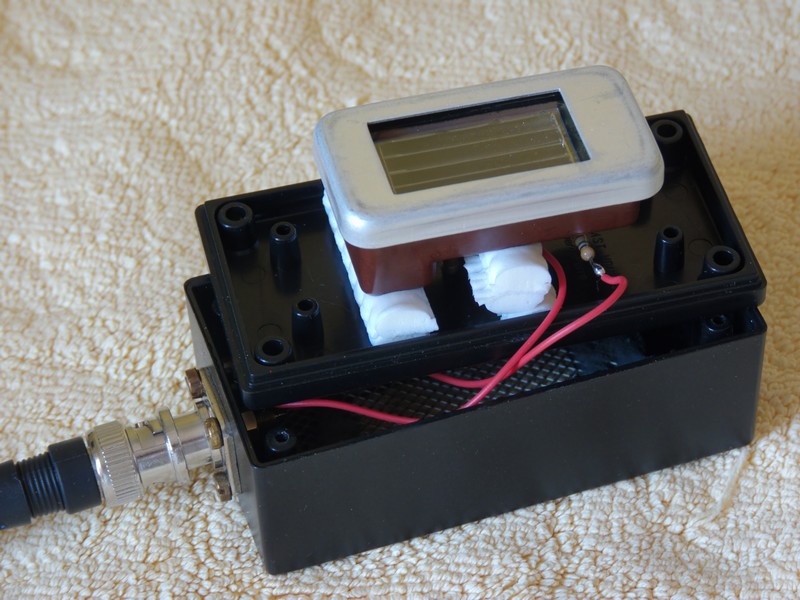
Qui sotto si vede la valigetta che contiene
il contatore e le due sonde.
Here below you can see the box containing both the counter
and the probes.

Qui si vede il contatore acceso con la sonda piccola e il cavo USB
che serve per collegarlo ad un PC. Con il PC si puň cambiare il SW (e quindi
tarare i ratei di conversione CPM-µSv/h per ciascuna sonda) e salvare i dati con
le misure. Inoltre il collegamento USB permette di alimentare tutto il circuito,
senza utilizzare la pila. I tre interruttori sono On-Off; luce display e
cicalino audio On-Off. I cavi delle sonde sono lunghi circa 1,5 metri ciascuno.
Here you can see the counter turned on with the little
probe and the USB cable to connect it to a PC. With the PC you can change
the SW (and then you can calibrate the CPM-µSv/h conversion
rate for each probe) and save the measures. Besides, the USB cable powers the
circuit without using the battery. The three switches are On-Off, display light
and the audio beeper On-Off. The probes' cables are about 1,5 meters long.
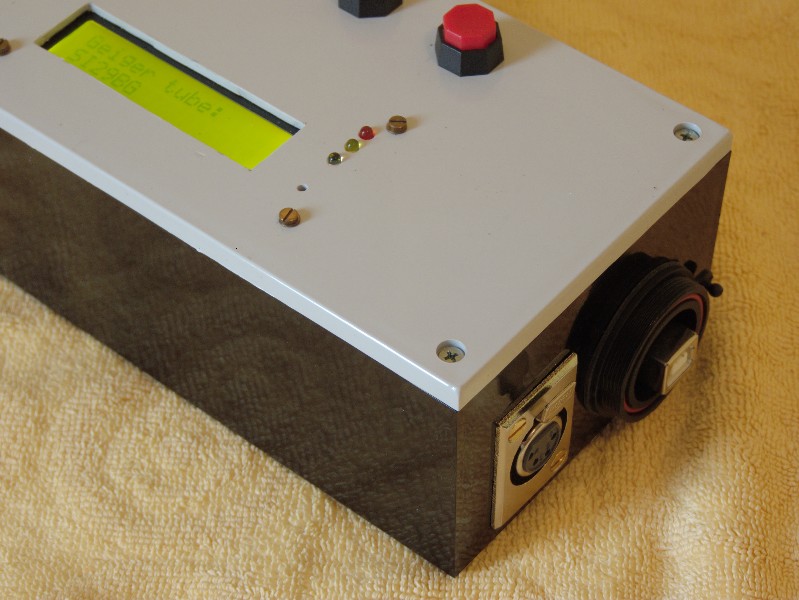
Qui sotto si vedono in dettaglio i connettori. Sono uno per il
collegamento USB (item RS-Components: 4686327) e l'altro č l'XLR a 4 poli per il
collegamento delle sonde. I pin sono cosě utilizzati: + e - di alimentazione a
400 V per le sonde; due fili per il jumper del processore per
scegliere il rateo di
conversione opportuno; la massa č il GND del circuito.
Here below you can see the connectors. One is for the USB
connection (RS-Components item: 4686327),
the other one is a 4-pin XLR type for the probes. The pins are: + and - for the 400 V for
the probes; two are used for the processor jumper to select the proper
conversion rate; the body is the circuit GND.
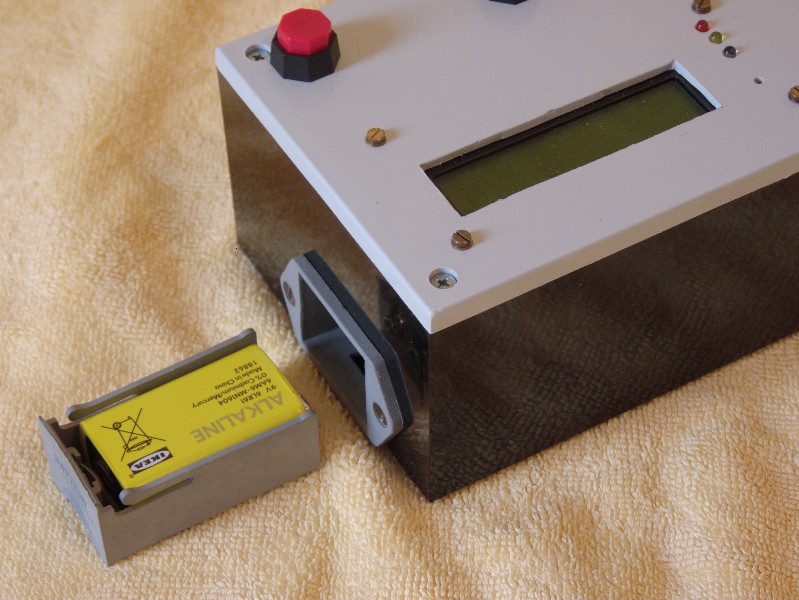
Qui sotto si vede il portapila in dettaglio. Ho scelto un modello a
cassettino (item RS-Components: 508116) per poter cambiare la pila senza dover
smontare il contenitore.
Here there is a battery holder's detail. I choose a drawer type (RS-Components item: 508116)
to be able to change the battery without opening the counter
box.
Qui sotto si vede l'interno del contatore. In particolare, sulla destra
del circuito, ci sono i fili tra il pin 15 del processore e la massa: servono
per indicare al processore quale sonda si sta utilizzando. Si vede poi il piccolo ponticello
di filo rosso che bypassa la resistenza di limitazione da 4,7 MOhm
che č stata collegata
direttamente in serie a ciascun tubo
Geiger-Müller. Questo,
unito al fatto che il segnale č prelevato verso massa, mi ha permesso di
utilizzare dei cavi piuttosto lunghi per le sonde. I cavi sono due robusti
cavi audio da palco (2 poli piů schermo).
Here below you can see the inside of the box. In details, on the right of the
circuit, there are the two wires between the processor pin #15 and the ground:
they are used to tell the processor which probe is used. Then there is the
little red wire that bypass the 4,7 MOhm limiting resistor that has been soldered
directly on
each Geiger-Müller tube. This thing, together with the fact that the signal is picked up toward the
ground, allowed me to use quite long cables for the probes. These cables are two
strong audio cables (2 wires plus shielding).
La taratura dei 400 V, valida per entrambe
per le sonde, č stata effettuata tramite un partitore 1:1000 con resistenza di
ingresso da 1 GOhm (item RS-Components: 2960780) e resistenza verso massa da
1001 kOhm (due resistenze in serie). Questo mi ha permesso di non sovraccaricare
il survoltore del circuito mentre lo taravo.
The 400 V calibration, good for both the probes, has been
made with a 1:1000 voltage divider with input resistance of 1 GOhm (RS-Components
item : 2960780) and output resistance of 1001 kOhm
(two series resistors). That allowed me to calibrate the voltage booster without
overcharging it.

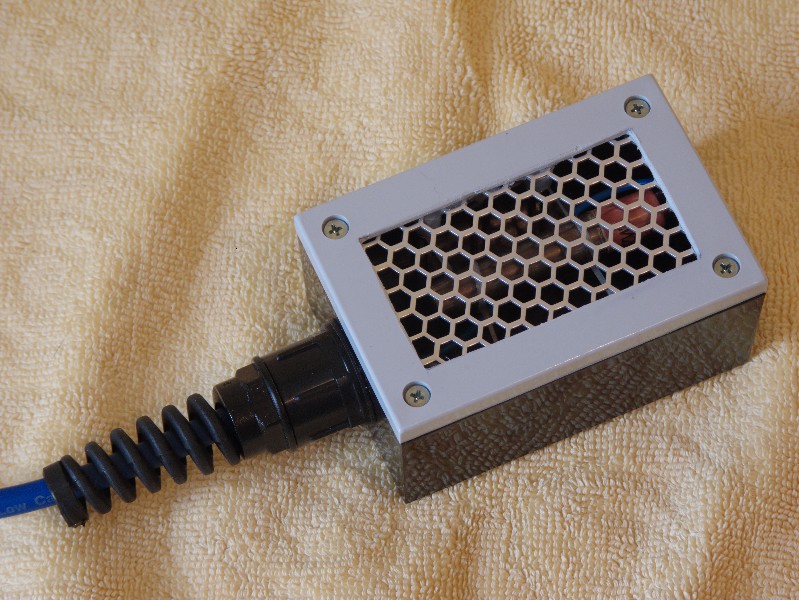
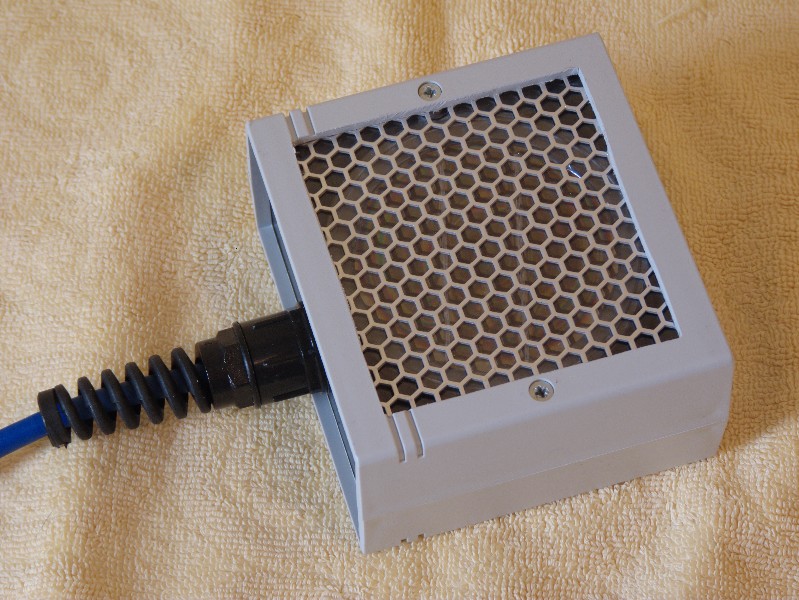
Qui sotto si vede la sonda basata sul tubo
Geiger-Müller SI-29BG. Le grigliette
per proteggere le sonde le ho ritagliate da una
griglia di alluminio recuperata da un bidone del riciclo metalli.
Here you can see the SI-29BG Geiger-Müller tube based
probe. The small nets
protecting the probes have been cut out from an aluminium grating taken from a waste
container.
Ho realizzato una lastra di alluminio da anteporre ad
entrambe le sonde per fermare le radiazioni
Beta e misurate
quindi solo le Gamma.
I prepared an aluminium plate to block the
Beta radiation and to
measure the Gamma only.
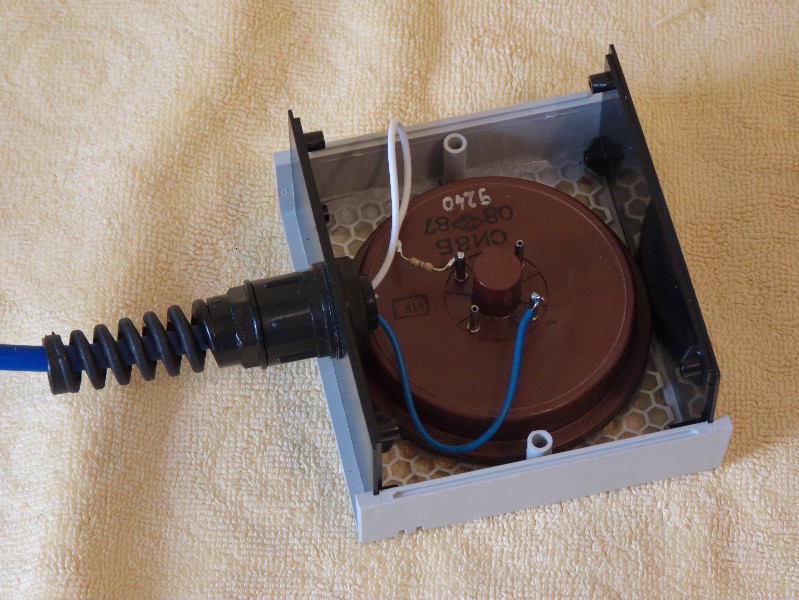
Qui sotto si vede l'interno della sonda basata sul tubo
Geiger-Müller SI-29BG. Il tubo č
sospeso tramite uno spago cerato in modo che stia a circa 0,5 cm dalla griglietta.
Il fatto che il tubo sia sospeso lo
isola elettricamente dalla griglietta e lo protegge un po' anche da eventuali urti.
Here you can see the inside
of the SI-29BG Geiger-Müller tube based probe. The tube is hanged up by a waxed string
in such a way that the tube is held at about 0.5 cm from the net. This fact
insulates the tube from the small net and protects it from possible shocks.

Qui sotto si vede la sonda basata sul tubo
Geiger-Müller SI-8B
(pancake). Vista la delicatezza della finestra in mica di questo tubo e visto
che
di fatto č sensibile solo
alle radiazioni
Beta e
Gamma, l'ho protetto con un foglio di plastica fine utilizzato come
copertina trasparente per le rilegature da copisteria.
Here you can see the SI-8B pancake Geiger-Müller tube based probe.
I protected the tube using a thin plastic sheet, because the mica window of this
tube is very delicate and it is sensitive only to
Beta and
Gamma radiation.
Aggiornamento: il foglio di plastica trasparente č stato
sostituito da un cartoncino nero perchč ho scoperto che il tubo Geiger-Müller
SI-8B č sensibile alla luce e in particolare agli
UV:
probabilmente ionizzano il gas interno al tubo.
Update: the thin plastic sheet has been changed with a black paper because of
the sensitivity of the SI-8B Geiger-Müller tube to the light and in particular
to the UV light: probably
it
ionizes the gas inside the tube.
Qui sotto si vede l'interno della sonda basata sul tubo
Geiger-Müller SI-8B. Il tubo č
tenuto fermo da uno strato di spugna espansa (non mostrato
nella figura) posto tra la parte terminale dello
zoccolo e il coperchio del contenitore.
Below you can see the inside
of the Geiger-Müller SI-8B tube based probe. The tube is held by a plastic foam (not shown in
the picture) between the base and the cover of the box.
Qui sotto si vede la sonda basata sul tubo
Geiger-Müller SBT-11A
(pancake). Č sensibile anche alle radiazioni
Alfa.
Here you can see the SBT-11A pancake Geiger-Müller tube
based probe. It is sensitive to
Alpha radiation too.

Qui sotto si vede l'interno della sonda basata sul tubo
Geiger-Müller SBT-11A. Il
tubo č tenuto fermo da due pezzi di spugna espansa.
Below you can see the inside
of the Geiger-Müller SBT-11A tube based probe. The tube is held by two pieces of
plastic foam
Una volta realizzati il contatore e le sonde, mi sono posto il problema della
taratura. Fortunatamente la taratura si effettua via SW variando i ratei di
conversione, indipendentemente per le due sonde. La terza,
basata sul tubo SBT-11A, non č calibrata. Il problema č che non ho una
campione tarato. Mi sono dovuto accontentare della radiazione di fondo.
The last problem has been how to calibrate the counter and the
probes. Fortunately the calibration is made via SW changing the conversion
rates, independently for each of the two probes. The third one, based on the
SBT-11A tube, is not calibrated. The fact is that I have no a calibrated
radioactive specimen. So I used the natural radioactive background.
Ho chiesto all'ARPA se potevano dirmi quanto era il
fondo naturale a Milano. Mi hanno risposto:
"Per Milano 100 nSv/h č il valore medio che in genere si
trova con qualche differenza tra prati, asfalto, casa e cemento. La media perň č
quella". Ho tarato
entrambe le sonde per questo valore, integrando
le misure su 10
minuti. Un controllo su un oggetto radioattivo ha
mostrato misure congruenti per entrambe le sonde.
I asked to ARPA (the local agency for environmental
protection) to know the natural background in Milan. They answered me: "The 100 nSv/h is the
mean value, with some difference among grass, asphalt, house and concrete". So I
calibrated both the probes using this value, integrating the measures over a 10
minutes period. A check with a radioactive object showed consistent measures for
both the probes.
Per vedere le statistiche di accesso a questo sito dal 9 agosto 1999:
To have a look at the statistics of this site from August 9, 1999:
Torna in cima alla pagina
Back to top
Copyright © 1999-2025 Alberto Marturini
Pagina aggiornata il: 20 gennaio 2018.
Last update of this page: January
20, 2018.
$